
 |
| Zion Narrows before quilting |
I'm happy to say that the quilt top is done. It's trimmed and ready for basting. In this blog I'll show you how I made the confetti trees.
When I left you after the last blog I had used Liquid Stitch to glue down the main portions of the landscape. Before I started on the confetti trees I stitched down the edges of those main portions using monofilament thread and a tiny zig zag.
So, let's make some confetti.
 |
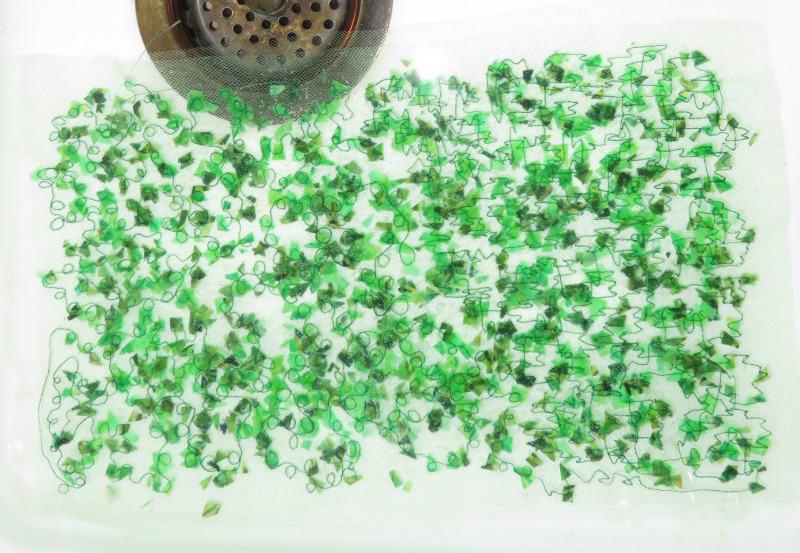
| It starts... |
What you are seeing above is one layer of Sulky Solvy with one layer of yellow tulle on top. I have tiny tiny bits of fabric confetti from a few assorted batiks - the pieces of confetti are smaller than 1/4 inch - many are about 1/8 inch. I sprayed 505 Basting spray over the Solvy/tulle and began sprinkling the confetti on the tulle.
Because the tulle effects the color of the final product the first thing to do is find the right tulle colors. You want the tulle to match the background as much as possible. The first tree I created had a light background so I used one layer of yellow tulle and I'll be putting one layer of a light green tulle on top.
When I created the confetti leaves for trees which had the dark rocks behind them, I used black tulle for the base and layered green tulle over the top.
 |
| Sprinkling the confetti |
You don't want to sprinkle the confetti on too thickly. The bits of fabric tend to stick together so I used a tweezers to smooth them out and separate them a bit. Notice some areas have more dense sprinkling than others. You want this. Why? Because you can use the dense confetti patches where there are more thickly leaved boughs in the canopy and use the less dense patches on the edges of these boughs - just like nature.
 |
| Confetti with black tulle layered on the bottom with green tulle on top |
Once the confetti is sprinkled down, cover it with another piece of tulle and another piece of Solvy. Then pin like mad.
 |
| Pinned layers of Solvy |
I experimented with different ways of sewing down the layers and you can see my first experiment below. I used a messy back and forth on one part and a loop-da-loo on the other. I didn't like the back/forth stitching and the loop-da-loo was ho-hum. For all the rest of my confetti patches I just used a small stipple with a variegated green thread.
If you go to my landscape quilt gallery and click on Sunset Sentinel you'll see another time I used this technique to make lacy leaves. When I created the tree in Sunset, I used lots of tiny loop-da-loos. The tree is more stylized with all those tiny circles. I didn't want that look for this quilt. Hence my choice to just stipple.
If you go to my landscape quilt gallery and click on Sunset Sentinel you'll see another time I used this technique to make lacy leaves. When I created the tree in Sunset, I used lots of tiny loop-da-loos. The tree is more stylized with all those tiny circles. I didn't want that look for this quilt. Hence my choice to just stipple.
 |
| Rinsing and soaking in hot water |
Once the confetti/Solvy layer is rinsed and dried you can start to cut out messy shapes and create foliage. Before you do that though, you want to have the tree trunk in place. Some of the patches you create for the tree canopy will be arranged under the tree and some on top so let me show you how I made the tree trunks.
 |
| This tree trunk is ready to go - |
If you've been following along on my blog you'll know that I'm following a photo I took while hiking The Narrows. I traced the tree from the photo onto tracing paper and then traced the tree patterns onto freezer paper.
 |
| The paper pattern and fabric |
Press the freezer paper pattern to the right side of your fabric.
Roughly cut it out.
Roughly cut it out.
 |
| Cut out pattern |
Smear Liquid Stitch all over the other side of your cut out shape. The stuff goes on really thick so I used a cheap kid's paint brush to smear it on.
Let it dry.
 |
| Liquid Stitch all over the tree trunk |
Once it is dry, use a fiber glass (Teflon) pressing sheet and press it. The glue smooshes out and becomes clear.
 |
| Press with pressing sheet |
Once you've pressed it flip the tree around and cut it out. The freezer paper might come up here and there, but not all that much.
 |
| Time to cut it out - |
 |
| Cut out tree with Liquid Stitch dried on the back |
Liquid Stitch seals the edges of your applique. It's a great way to fuse on delicate tree branches and your appliques really don't fray as much with this product. I've used Steam/Seam, WonderUnder, etc and there is a bit of fraying on those edges, this product really makes a difference.
 |
| Coloring the tree |
It's easier to shade and highlight the tree before it is put in place so I did. The light is shining down on the left side of this tree and the right is in the shade. I used a handy Sharpie and a light/white marker that I found in the scrap booking sections of Michael's craft store.
 |
| The tree is in place |
When I begin to arrange the tree trunks and foliage, I lightly press the top of the tree with a hot iron. This somewhat activates the glue in the Liquid Stitch, but doesn't make it permanent. I do this so I can slip messy cut portions of the confetti foliage under the branches if I want. I build up my trees as sort of a collage.
Let's look at some closeups.
Let's look at some closeups.
 |
| The lightest tree |
The small tree on the left was in the sunlight. I used lighter shades for the confetti. I used a glue stick to glue the messy cut bough shapes to the quilt top. Then I went over those patches with a white marker to highlight some of the 'leaves' and I used a green fabric dye marker to shade the boughs under the branches.
Between the different colors of tulle and the markers I have a somewhat natural looking tree. Here are 3 more trees-
The trees on the right are in the shade. I used darker tulle, darker confetti bits and just a little bit of white marker here and there. The photo isn't the best... sorry about that.
(I really don't like my camera. It's a Cannon Powershot and it doesn't do a good job of capturing sharp images nor does it have a good white balance which means my colors are always off on all my shots and I have to try to correct them.)
Between the different colors of tulle and the markers I have a somewhat natural looking tree. Here are 3 more trees-
 |
| More trees |
(I really don't like my camera. It's a Cannon Powershot and it doesn't do a good job of capturing sharp images nor does it have a good white balance which means my colors are always off on all my shots and I have to try to correct them.)
 |
| Tree on the right |
One thing I discovered by making all these different confetti trees is that if you choose to use tiny confetti pieces which are a mix of light and dark you'll end up with a very unnatural looking tree; it will end up rather dotty looking. I did discover this the hard way and to minimize the dotty polka dot look I used a dark green marker and colored the too light bits of confetti.
I should mention that throughout all this tree making and water making and canyon making I have been using green or red value finders. I've compared the values of the fabrics I've chosen with the values on the photograph.
This means that though there might not be huge value changes between my trees and the canyon walls, my trees are faithful to the photograph.
So, after all this, here is my finished quilt top and the photo I used to create it. The water is the only thing which isn't quite right, but on the whole I really like my landscape. Mine is more colorful than the original but that is ok - I was limited by the fabrics which are available and I like color.
Perhaps if I had found a better fabric for the water I could have done it better, but it is what it is and that Stonehenge fabric was pretty darn close. (You'll have to go back a couple of blogs to see it untouched.)
 |
| Top of the tall tree |
This means that though there might not be huge value changes between my trees and the canyon walls, my trees are faithful to the photograph.
So, after all this, here is my finished quilt top and the photo I used to create it. The water is the only thing which isn't quite right, but on the whole I really like my landscape. Mine is more colorful than the original but that is ok - I was limited by the fabrics which are available and I like color.
Perhaps if I had found a better fabric for the water I could have done it better, but it is what it is and that Stonehenge fabric was pretty darn close. (You'll have to go back a couple of blogs to see it untouched.)
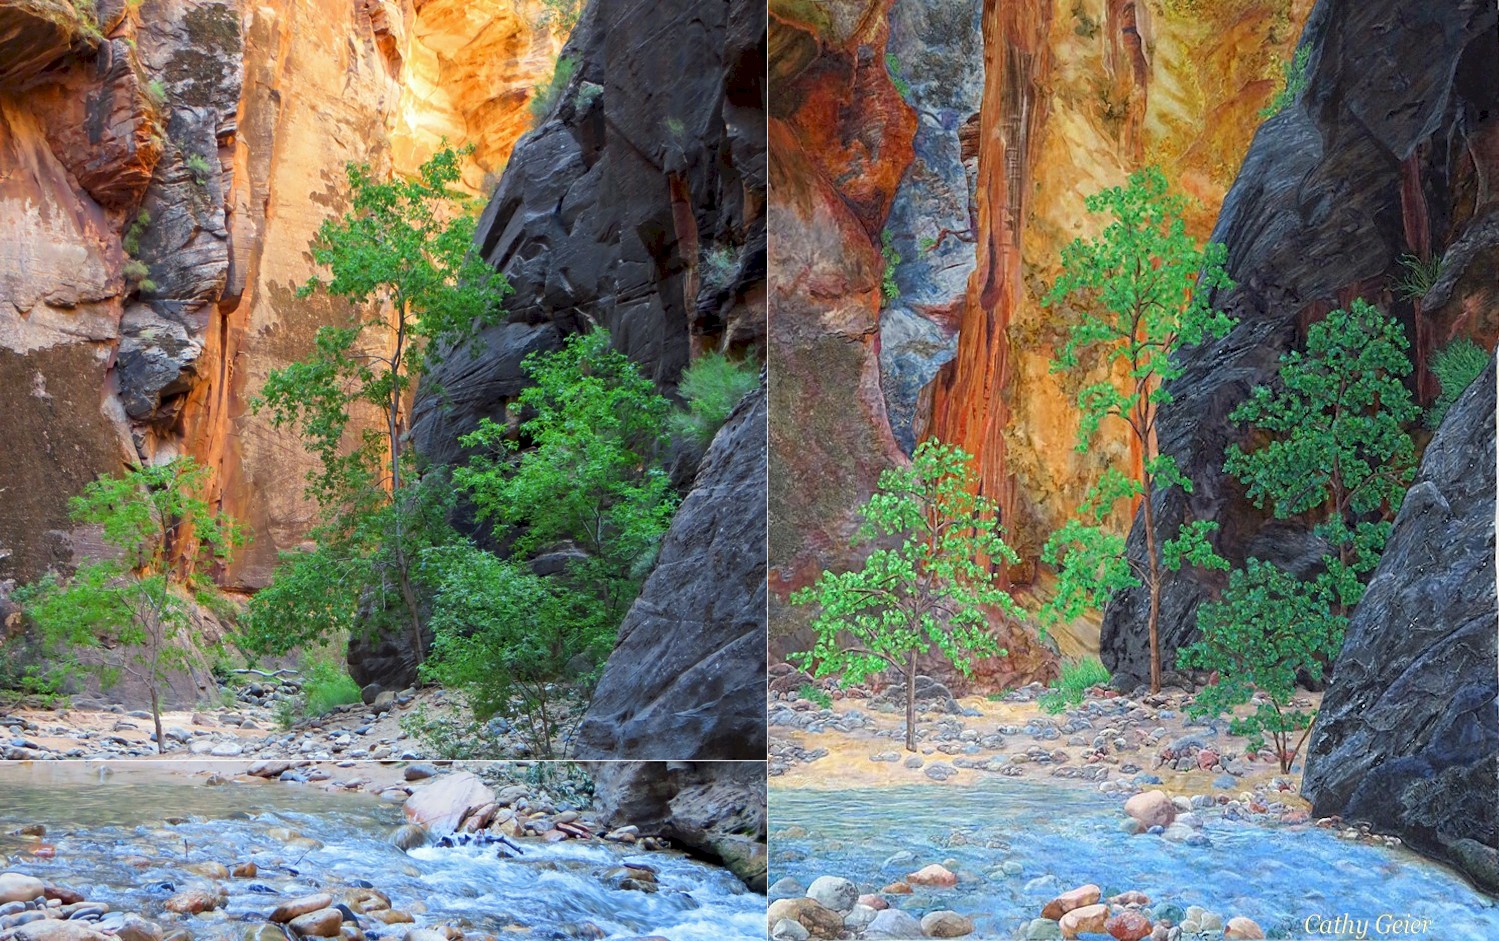 |
| Comparison |
I may go back and fuse a few tiny leaves here and there on the trees on the right, but that won't be a big deal. I think I might also go back and add some green to the distant water.
I'm hoping that I'll have time to baste and start quilting this weekend.
In the meantime I hope you've enjoyed watching the progress on this landscape quilt. Comments welcome.
Happy Quilting
Oh - I really need a better name for this quilt.
Hint Hint
I'm hoping that I'll have time to baste and start quilting this weekend.
In the meantime I hope you've enjoyed watching the progress on this landscape quilt. Comments welcome.
Happy Quilting
Oh - I really need a better name for this quilt.
Hint Hint
Zion is one of my favorite places and you have captured the Narrows beautifully!
ReplyDeleteThanks!
DeleteZion Park! Excellent, you are very tallented, wonderful skills to make a quilt look real.
ReplyDeleteIt was a lot of fun coming up with ways to make fabric look like a photo. Thanks for the compliments!
DeleteThis is a work of art! Thank you for sharing your process and all of your techniques.
ReplyDeleteHave fun quilting it!
Thanks!!
DeleteI loved watching this piece come together. It is gorgeous!
ReplyDeleteThanks!! I'm glad you like the show. :)
DeleteWow! I love your art work!
ReplyDeleteThank you!
DeleteI have to say that I learn something from you every time I visit. I recently attempted to play with confetti to make a tree top and my end result wasn't at all what I wanted. I used far too many little pieces of fabric, thinking I had to fill the entire thing in. Now I see your version I know what I could have done better! I didn't use the tulle on the base either and I think that would make a big difference. Thank you!!!!
ReplyDeleteLess is better in most cases because you want the background to show through. I've used confetti with and without tulle and with the tulle on top it ends up smoother and not so shaggy. Generally with my landscapes I like this look better.
DeleteThank you Soo much for the detailed description. Hope to try it some day !
ReplyDeleteSurabhi
This technique is a lot of fun!
DeleteU.N.B.E.L.I.E.V.A.B.L.E.
ReplyDeleteComparing your picture to your quilt is.....I can't even think of a word that fits! I seriously can't get over this!
Cathy, Thank you for sharing your techniques for the tree and leaves. I belong to a Scrap Quilt Club in my area and our project for the Spring is a Tree Quilt. I found your site and book on the internet. I ordered your book and I am looking forward to creating a landscape quilt showing the view out my window of a tree and a pond. Thank you again.
ReplyDeleteWonderful! I'm glad you like it - there are some patterns for branches and small trees in the book so that should be helpful. If you ever get a chance to send me a pic of your quilt I'd love to see it!
Delete