
 |
| He Makes Beautiful Things out of the Dust - the garden is done It's been a long time since I've blogged or had time for quilting - it's been a long hard year for me. Last year someone quite close to me was diagnosed with ovarian cancer and I helped her and her family through chemotherapy. Now it's come back and I'm sad about what lies ahead. I started this quilt last April or so I think, I hardly remember. You can see a bit about how I put it together and what inspired me by reading on. |
The inspiration for this quilt comes from a song we used to sing in church by the Gungors called "He Makes Beautiful Things" here is a link to the YouTube vid they put out -
Beautiful Things
Essentially the song lyrics are these -
Beautiful Things
Essentially the song lyrics are these -
"Beautiful Things"
All this pain
I wonder if I’ll ever find my way
I wonder if my life could really change at all
All this earth
Could all that is lost ever be found
Could a garden come up from this ground at all?
(Chorus)
You make beautiful things
(Chorus)
You make beautiful things
You make beautiful things out of the dust
You make beautiful things
You make beautiful things out of us
All around
Hope is springing up from this old ground
Out of chaos life is being found in You.
You make me new, You are making me new
You make me new, You are making me new
My idea was that I'd build a garden with everything uncurling and unfurling and growing up toward the sun and sky. Everything being made of the same forms of 'dust' so the woman has leaves and flowers on her legs and her dress has the same circular patterns as the ferns, some of the flowers and the bark on the tree. Everything uncurling and being made beautiful.
 |
| Fern pattern |
Sorry about my fern pattern - I can't rotate the darn thing once it's uploaded and blogspot makes it tricky to go back and reload corrected pics. Anyway, if you follow my previous blogs then you know I make patterns on freezer paper a LOT. This quilt is no different. I traced these ferns on freezer paper and will be building them bit by bit on Pellon EK 130 my go to choice for foundation when I'm making appliques.
 |
| First fern part |
So, cutting out the first fern and the spine of the first fern from the freezer paper pattern I pressed it to the fabric I chose, cut out the fabric and arranged it on the foundation. (That foundation has a fusible side, see other blog posts for how I've used it in the past). I put the original drawing of the ferns under the Pellon foundation to make sure I have the placement right and lightly press it with a hot iron using a fiberglass pressing sheet to hold that fabric in place.
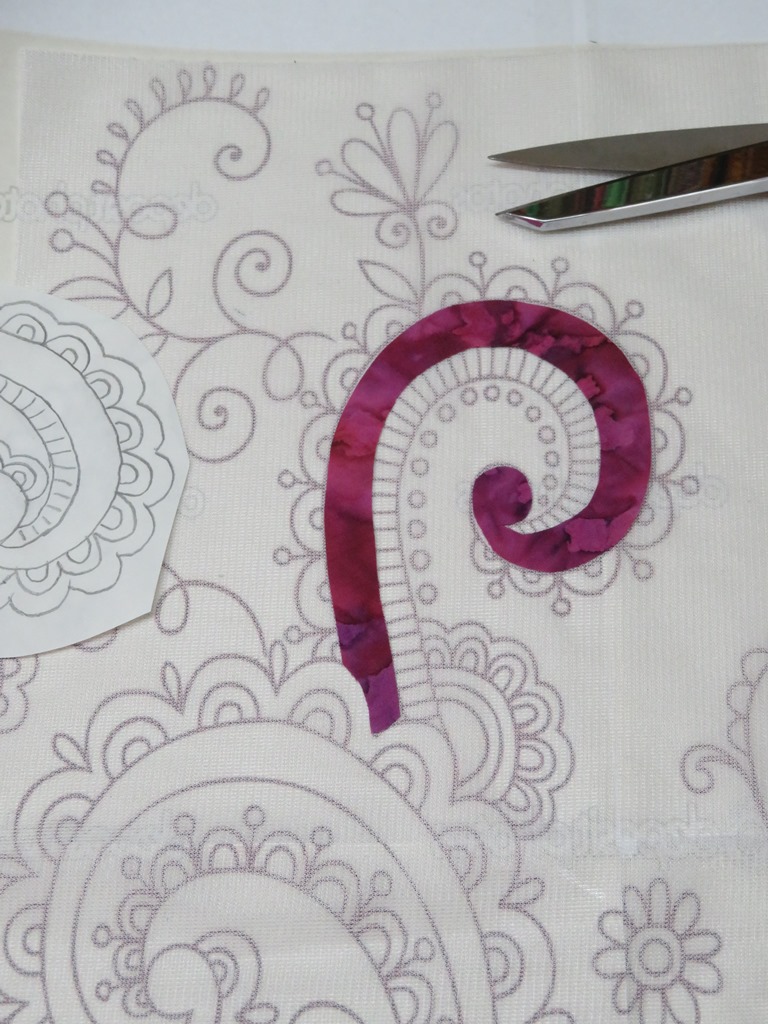 |
| Spine is in place |
I chose this hot pink for the outer curvy piece, so here is the cut out freezer paper paper pattern pressed to the top of that piece of fabric. All I have to do is cut it out and arrange it on the Pellon next to the spine.
 |
| The outer piece |
Can you see how I'm building the fern? I added the dark green inner spine thingy or the lighter bumpy green and then the dark green part, can't remember. Anyway, I just built my ferns bit by bit.
 |
| Top fern is done |
You'll notice more details on the drawings of the ferns under the foundation, I might add beads, etc once the quilt top is put together and quilted. We'll see.
 |
| Ferns |
It was pretty soothing working on things little by little. Just to play bit by bit when I had time was nice and relaxing. Plus, I've never done anything like this before. Most of my quilts are sort of like 'realistic', this one is supposed to be purely decorative.
 |
| Flowers |
I made my flowers the same way as the ferns only when I started building my garden I decided that I didn't like them in clumps I wanted them mixed up so I cut them up and mixed the blues in with other flowers.
You're going to kill me but I can't really tell you how I made my joyful woman. I can tell you what I remember though.
 |
| More flowers or a plant thingy |
 |
| Joyful woman batik fabric |
I didn't want a white woman, nor a black woman. I wanted a race neutral woman. She represents all of us being transformed and dancing with joy in a garden made of 'dust'. She also had to stand out and be of darker value than the sky behind her but I didn't want to make her just a silhouette like the dancing woman in my quilt Interwoven. And I wanted her to have purple hair. Did I mention that I had purple streaks put in my hair last year and I LOVE them?!!!
I LOVE my purple streaks!!
I LOVE my purple streaks!!
*Coughs*
(Back to the subject at hand)
So, I had a pattern on freezer paper and cut out her arms and legs from that fabric you see above. I carefully positioned the portion of the pattern for her head on part of the batik fabric that had flesh tone flowing into purple. I used a white marker here and there to highlight and probably used a purple marker to darken and streak her hair. I might have used a sand colored crayon to add more flesh tones. I know I found a rose crayon or something to lightly color her lip area but she's pretty non specific in her features. Her dress is a separate batik that I used Inktense Color Blocks on to make more purple and pink so she wouldn't be washed out by the ferns.
Let's face it, I had help from above!
 |
| My joyful woman - me before I discovered peanut butter snickers bars, lol. |
Let's face it, I had help from above!
Ok, on to the background. It's NOT pieced!! It's appliqued on a foundation of... you guess it, Pellon EK130. I wonder if I should become a spokesman for that product or buy stock in it!
 |
| My floor, Pellon EK130, my iron and batik hexies |
So, I cut out a gazillion hexies. I have so many left over I'm going to make another quilt when this one is done. I put my foundation down and arranged the hexies starting at the bottom and working up. The foundation is 20 inches wide so I overlapped it a bit when I started adding the sky fabric which you can see in the next pic.
 |
| Adding the sky |
See that overlap of the foundation? It's about 1/4 to 1/2 inch I think. I'm standing on the top (sky side) taking this pic so the green isn't showing in case you are confused.
 |
| Almost done |
I decided to cut up more hexies and finish off the edges so they would be straight but I didn't bother taking a pic for you. I also used a long ruler and measured the straight parts of the hexies to try to keep them aligned properly. Once the foundation was filled I pressed them in place using steam and stitched down the raw edges using monofilament thread and a tiny zig-zag stitch.
Now, on to how I made the curly tree.
Now, on to how I made the curly tree.
 |
| Freezer paper pattern of the tree |
Once again I made a freezer paper pattern of my tree. (You can see my graph paper drawing/sketch in the back as I was figuring out sizes and placement, etc.) Anyway, notice all the hash marks between the branches? These are very important because I have to take the pattern apart to create the tree and then put it back together again to recreate the tree on my quilt.
(PS. Isn't my ironing board cover ridiculous?! I don't even bother buying them anymore because I go through them like water. I paint on them, fuse on them, use markers on them, use glue on them, lol. Now I have an old stained tablecloth and throw it into the wash every now and then! But I digress)
So, I cut apart my freezer paper pattern and each piece becomes a different branch and a different color with darker values toward the top of the sky. Sort of.
 |
| Designing and arranging the tree |
I found it helpful to put up pieces to visualize color dancing around in the branches.
 |
| Tree's all done! |
Actually what you are seeing is the exact opposite of what the the tree will look like. Why? Because you are looking at the wrong side of the freezer paper patterns. Don't think about it too hard, it will give you a headache. It's giving me one now, lol.
I like to use Liquid Thread or Liquid Stitch when I can because it seals raw edges and it's fun. It's a thick fusible glue. I left the freezer paper on the right side of the branches, 'painted' on the glue and let it dry.
 |
| Liquid Stitch |
If you go to Labels on the right side of my blog you'll see Liquid Stitch and you can read about how I use it. It's great for when you don't want seams from patchwork to show through your applique or you don't want loose threads from unraveling raw edges. It does NOT work well on small appliques though so I only use it on the big stuff.
When all the branches were dry again, I reassembled my pattern, making sure all the branches were in the right place.
When all the branches were dry again, I reassembled my pattern, making sure all the branches were in the right place.
 |
| The tree, all put back together only there is fabric under the freezer paper |
Notice those hash marks in the pic below? They helped me figure out which curly branch went where and I made sure they were all aligned properly.
 |
| The branches, freezer paper pattern and fabric |
At this point I slipped fiber glass pressing sheets under the branches and fused the branches to each other. I arranged the tree and fused it to the quilt top. Then I stitched the tree into place using monofilament thread and a tiny zig-zag stitch. Whew!
 |
| Progress so far |
Welp, that it's for me. Now if you look closely, you'll notice there is a 'hole' in the tree between the purple and blue branches on the right. Why? you might ask? Because my son and I were taking over coffee one morning last month - did I mention my youngest son moved back home? no? oh. Well my son moved back home last fall.
(Cooking, thy name is Cathy.)
Anyway, we were talking about a specific kind of bird and it's symbolism and I realized that I had to have that bird in this quilt. It's a bird which symbolizes rebirth and rising from ashes (dust!), and it's a bird with multi-color wings. So I made a bird and it's going to be flying up from from the tree.
Hopefully I'll be able to show you soon.
I'm also going to start working on leaves for the tree.
And a few butterflies. 🙂
Sorry if this blog has been too long, I guess that's what happens when you've been storing things up for months and months. Comments are welcome as always!
It’s beautiful! And love your inspiration (it’s one of my favorite songs). Thanks for sharing.
ReplyDeleteThanks Jane. I'm always comforted by that song and I wish we sang it more often, but it's an older song now and alas, I only hear it when I look it up or sign it to myself.
DeleteYour quilts are always so beautiful and unique! It's good to hear from you.
ReplyDeleteIt's been a rough year, that's for sure. Thanks for the compliments and I'm glad you like it. I've been able to work on it a little bit over the last few weeks so hopefully I'll have something more to show here in the next week or two. :)
DeleteCathy, you are amazing. SOOOOOOOO beautiful and creative.
ReplyDeleteThank you Pat. :)
DeleteI'm glad you like the quilt.
I learn something every time I read one of your posts - thank you! This time it was the use of Liquid Stitch, a product I have never heard of and will definitely be adding to my stash. As for freezer paper - I bought an entire case. Can't live without that stuff! Your latest piece is so full of life and movement - love it.
ReplyDeleteFreezer paper and parchment paper - both 'cooking' supplies that I keep in my sewing room. I'm glad you like the quilt so far, I've been able to get some stuff done, the phoenix and 5 little blue birds plus some leaves. I'm stalled out a bit now because I want to make something to symbolize dust. I have lots of ideas but I need to actually sit down and work on them instead of thinking and thinking and thinking and then playing Freecell, lol.
DeleteThanks Blaire, I'm glad you like the quilt so far. :)
ReplyDeleteLove the colors you've chosen for this quilt! Also, you have been a phenomenal mentor to my quilting life. Thank you see much!
ReplyDeleteWow, and thanks! I'm so happy to have inspired you and helped you! That's awesome.
Delete*Hugs*