
 |
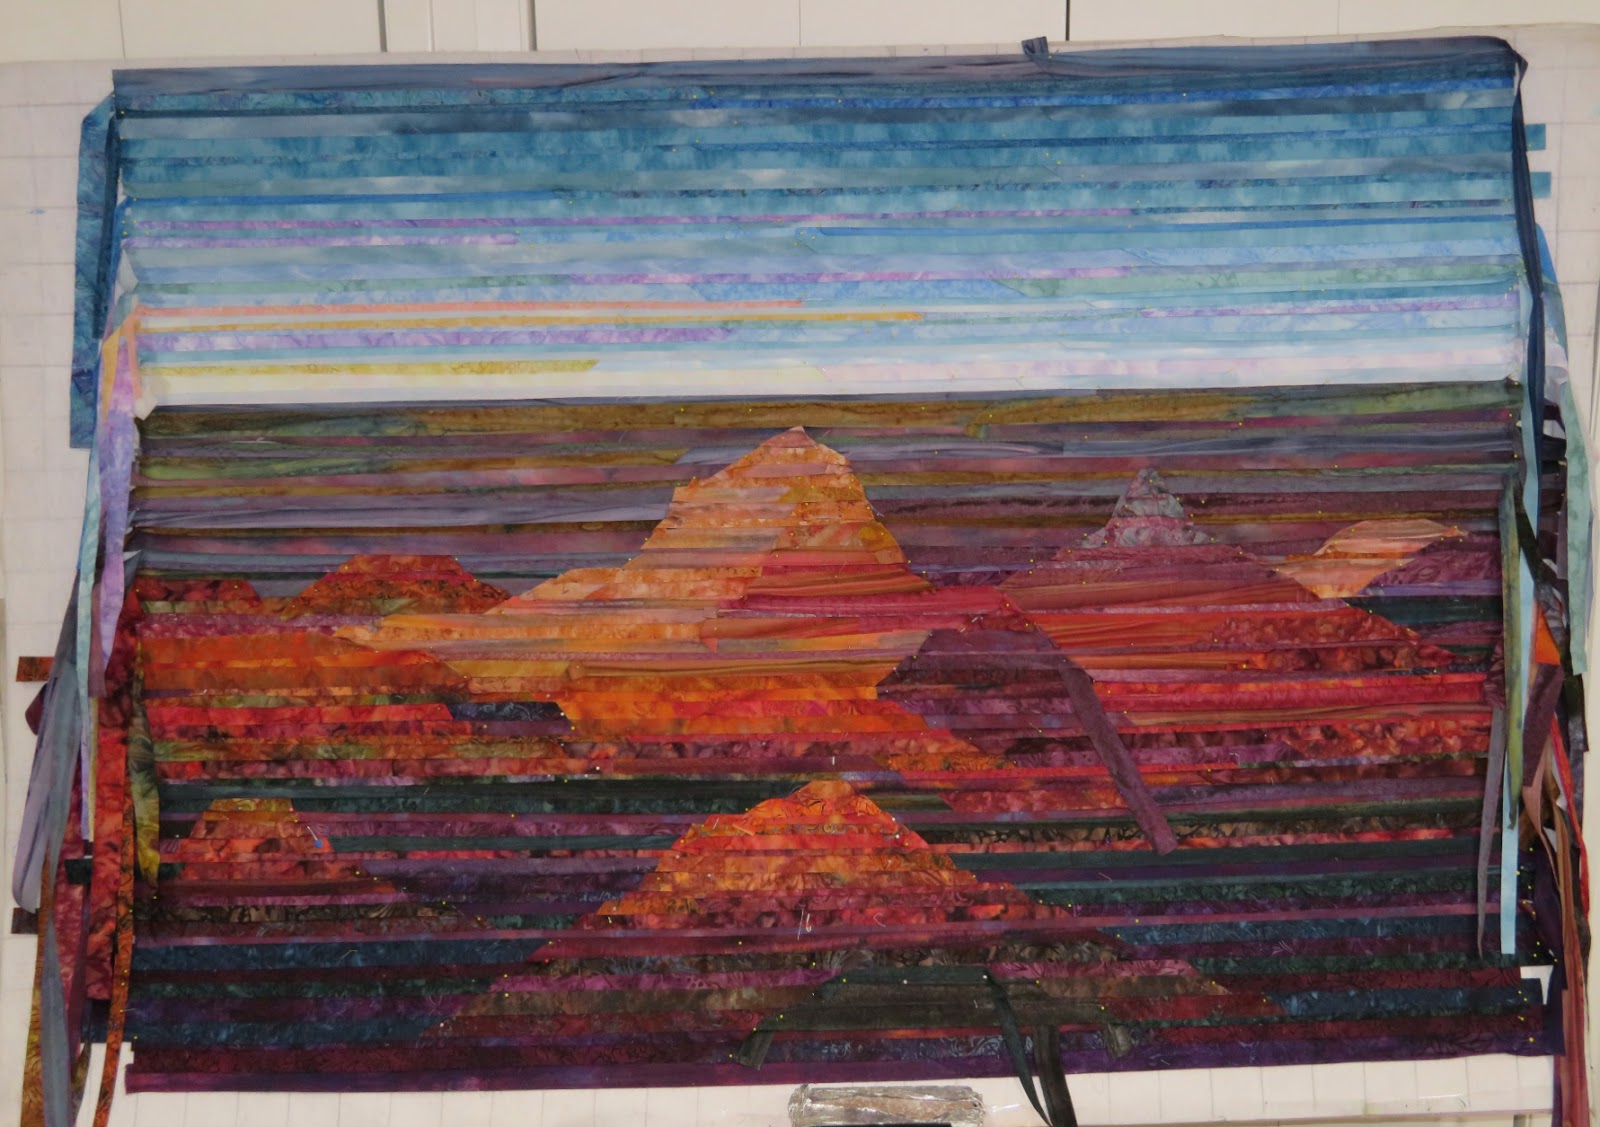
| Grand Canyon at sunset - this is basted and not yet quilted |
It's been a heck of a last 3 months but hubby is up and back at work half time now. Thank you for all the encouragement you've given me since the last blog and I'm happy to be back to work myself!
I started this quilt last August before we left for Ukraine, I just never had time to show you what I was working on after I finished The Perfect Nanny (Mary Poppins). By the way, I sent it off to the National Quilt Museum where it will be part of their traveling exhibition for the next 2 years. Maybe you'll be able to go to an AQS show and see this added exhibit?
 |
| My photo of Mohave Point at sunset |
Years ago I was able to spend one day (one day! only!) at the southern rim of the Grand Canyon. Ted and I walked along the rim trail at dusk and then sunset. I found a good place to take some photographs and the photo above was taken just as the sun was setting and the rays highlighted the canyon formations. The light was just right and the rocks glowed and turned red.
I knew I would one day make this scene into a quilt so the first thing I did was crop the photo.
I knew I would one day make this scene into a quilt so the first thing I did was crop the photo.
 |
| My photo - cropped |
This is a 'rough draft' of my photo and I had this much on my design wall before we left for Europe in September -
 |
| Rough draft - |
When I started back to work on this quilt I had a few problems... first was that I was out of room on my design wall so a lot of my strips were bunched and hidden. The second was more complicated - I didn't like the lack of depth or the lack of 'edges' in my rock formations. If you look at this (above) pic and then compare it to the photo, you'll see what I mean. The main bluff shape looked like a breast and it lacked dimension. Third - I didn't think the sky looked right.
The first thing I needed to do is adapt my basic pattern and draw more specific shapes into the bluffs.
The first thing I needed to do is adapt my basic pattern and draw more specific shapes into the bluffs.
 |
| My pattern - please don't feel free to copy or take my pattern for your own use. Thanks! This is my adapted pattern - I carefully traced the major geological rock formations onto my graph paper. I had chosen to make this strip pieced quilt using a strip width 'rhythm' of two finished 3/4 inch strips and then a 1/4 inch strip. So as I adapted my pattern I drew a line halfway through each square on my graph paper. I didn't bother trying to do anything with that 1/4 inch strip. Each full square on my graph paper represents 1-1/2 inches in finished strips. If you look carefully at my pattern, you'll see that I numbered each strip. I stopped at 28 because that was all I could fit as I drew my fold/sew lines on my tear-away foundation. (See my book and other blog entries here for how I piece straight strips on a foundation. Click on "strip pieced" from the Labels section on the right side of my blog.) I've never made a landscape quite like this one before in terms of it's complexity. I had to measure carefully and keep track of exactly where one rocky crevice would begin and one would disappear into the shadows. If you care to see this more clearly, look at my quilt Carpathian Mountain Sunset - you can find it in my quilt gallery. In that quilt, the mountains are simply blue and the crevices are only created through quilting lines. I wanted something more for this quilt. This is how I accomplished it. |
 |
| My foundation - marked with bluff/crevice lines and the 1/4 inch seam allowances for each strip. |
Ok... This is what you are looking at above. It's the bottom half of my canyon partially pieced. You'll notice the long horizontal fold/sew lines that I drew using my cutting mat and ruler and a pen. I wanted two 3/4 and one 1/4 inch finished strips so when I drew those long lines I drew 1-1/4 inch, 1-1/4 inch and then 3/4 inch widths. My landscape is 60 inches wide by the way.
Now, I'm going to glue strips of fabric between these lines. Then I'll fold along each of those long lines and stitch 1/4 inch from the edge of the fold, with me?! (See book, lol). Because of the precise nature of this landscape, I had to take that 1/4 inch seam allowance into account as I created each bluff/crevice.
Here is a closeup of the top of the main formation.
Here is a closeup of the top of the main formation.
 |
| Top of the main bluff with 1/4 inch seams marked to line up angles such that when the folding and sewing is done, each angled strip nestles next to the adjacent one. |
You can't imagine how hard it would be to piece this precisely using traditional piecing methods. (And I kind of hate piecing anyway!! Shame on me, I know. Still, for me piecing is the boring part of making a quilt...)
So, I fold under edges and applique complicated strip segments - I'll show you.
So, I fold under edges and applique complicated strip segments - I'll show you.
 |
| Creating the angled strip sets |
When sewing or putting two different strips of fabric together, one strip is always on top and one on the bottom. This is the same with sewing the angles together; look at the seam, it's always pressed one way or the other. So, as I designed each bluff/crevice I glued down the center of the strips of fabric which would be on top and then I turned under the edges of that strip and glued the angle in place using a simple glue stick.
In other words -
I glued the edge of the top strip under so it wouldn't be raw edge and trimmed off the excess fabric. Then I glued that top angle to the strip beneath it.
Clear as mud?
In other words -
I glued the edge of the top strip under so it wouldn't be raw edge and trimmed off the excess fabric. Then I glued that top angle to the strip beneath it.
Clear as mud?
 |
| Gluing down the second side |
I could peak and lift up the background strip (the burgundy one on the right) to make sure I had folded the angle correctly and placed it correctly on top. Remember, the seam allowance of the top strip's angled edge is glued under so it is not a raw edge. The burgundy edge is a raw edge but it will be tucked under the lighter bluff strip so that won't matter. Once I had the strips exactly where and how I wanted them, I glued the top strip over the background strip.
Bit by bit, I created the Mohave Point view from my photo.
Next step-
Bit by bit, I created the Mohave Point view from my photo.
Next step-
 |
| Stitching down the glued angles |
If I haven't lost you altogether by now the next thing to do is to stitch each of those glued angles to the foundation. You must do this BEFORE you fold and sew along the grid lines because these angled edges are a little stiff and they can lift up off the foundation. I stitch these down so they stay precisely where I want them to stay.
 |
| This is what the bottom of my foundation looked like before I finished sewing along the horizontal grid lines. Kind of weird, huh? This is the next step - fold and sew along those grid lines. Stitch using a large needle and and tiny stitch. I use a 1/4 inch foot. You'll notice in the picture below that I'm sewing one of the long narrow 3/4 inch drawn rows that will finish into a 1/4 inch strip. I align my sewing foot with the LEFT side of the previous seam and that is how I get perfect 1/4 inch rows.  Remember way back when I said there were a couple of problems with my initial rough draft? One of them was running out of room on my design wall. Now that the bottom is pieced I have more room and it is as I suspected - the sky is all wrong. Mother nature can get away with a lot that I can't. It looks like a normal blue sky on a summer day only the canyon is way shadowed... rats.  |
A friend suggested that I tip the sky upside down and put the darker part next to the canyon. I did so - using photo software and this is what that looked like -

It turned out to be a helpful suggestion because it was clear that I needed darker values at the horizon line. In my photograph of the canyon, the sun is actually setting far out of the picture on the left. The sky being what it is - big - is still light in my photo but I had to express the idea that the sun is setting and casting shadows in the canyon. I reworked the sky and came up with this -
 |
| New sky design and it looks like my camera made this shot a bit color intense |
I cut another piece of foundation, drew in my grid lines, finished the top of the bluff and transferred my strip segments to the foundation. (See below.)
 |
| The top half in progress |
 |
| The top half before sewing along the fold/sew grid lines |
And here is the quilt top after I finished sewing it all together.
 |
| Mostly done quilt top |
I needed to fix a couple of things - I had to add to the top of the grayish shadowed formation on the right. I also needed to add a narrow band of descending highlighted red rock into one of the shadowed areas on right. I fused on these pieces.
 |
And there you have it!
It's been a complicated blog... but this was a complicated landscape. I bought a bunch of cool thread, lots of new needles and a marking pen so I'm ready to start quilting.
Just need time.
I hope you like it! Comments welcome. 🙂
It's been a complicated blog... but this was a complicated landscape. I bought a bunch of cool thread, lots of new needles and a marking pen so I'm ready to start quilting.
Just need time.
I hope you like it! Comments welcome. 🙂
awesome and amazing step by step
ReplyDeleteThanks! I'm glad you liked it. I wish I had taken more pictures in the beginning but I get caught up in the thing and forget. Then I'm like "DUH! You shoulda taken some pictures of this!" :)
DeleteI'm new to your blog. I'm glad your hubby is recouping will. What an adventure. I love your method of landscape quilting.
ReplyDeleteThanks - I like working with strips the best of anything I've done because you can add so much color and excitement with straight strips... this sounds kind of counter intuitive doesn't it? Lol.
DeleteHello Cathy,
ReplyDeleteHappy new year and very pleased to hear that your hubby is on the mend at last and that you are back to doing what you do. Your latest quilt is Superb and looks wonderful. I am very pleased to hear that your Mary Poppins quilt is on a 2 year tour!!! I loved it and must admit I've now got a few songs going through my head again. I would of course look forward to seeing how you quilt your grand canyon quilt. Happy quilting. Julie Beard Adelaide.
Hi my Aussie friend! I hope you aren't burning up or drying up - I've been hearing about really HOT temps and it's scary what's happening.
DeleteI hoping that tomorrow I can start marking where I want some of the canyon bluff/crevice lines to go. We'll see! My daughter is coming for a visit next week so my quilting time will be limited. Have a good weekend!
Thank you for all the great pointers. I have your book and am very eager to start your awesome method!
ReplyDeleteCool! Let me know if you have questions. There should be lots of help on this blog, too. The more fabrics and strips you use, the more vibrant the landscape. Have FUN!
DeleteYou are so generous in sharing your process - thanks! And the quilt is stunning.
ReplyDeleteThank you Glenda!
DeleteCathy, I was mesmerized the whole time reading this post. What a stunning landscape - not a surprise coming from you! Definitely going to pick up your book, although it'll be many months before I can get away from other projects to delve into your technique. Sure would love to get in on a class with you!
ReplyDeleteThanks Lynette, I'm glad you were inspired! I teach mostly around the Midwest these days but I might be as far away as Syracuse this fall; not sure where you live. :)
DeleteAnyway, you can always ask me if you have questions once you get started. Have fun!
A stunning quilt, Cathy. you have such incredible patience, all those strips!
ReplyDeleteThanks Penne - where this is a will there is a way! I wanted this on badly. :)
DeleteOh what a quilt. I often get tempted to wash glue off but am afraid of bleeding and don't do it.
ReplyDelete