
 |
| Overhanging Oak Branches 2017 |
Hi everyone! It's been a while since I blogged I know. I've been busy with regular life and one of the big changes is that I'm finally an empty nester. I thought things were supposed to slow down for those of us in this stage of life... so far that hasn't happened. Anyway, I'll be on the road teaching a lot this year so I'll blog when I can but it won't be a big year for blogs I'm afraid.
This quilt will eventually have it's own Page because RJR is going to make kits of the fabrics to sell. Stay tuned - I don't know when the pattern will be available. Most of the batiks I used to make it came from their new Malam Batiks and they are glorious light weight soft batiks - I really like them.
 |
| Ellie Cat |
Last blog had me finishing the background pond water. I arranged my big branches on the quilt top and someone came down into my sewing room to get some attention. (We love our kitty cats don't we?! I have to keep packing tape right by my sewing machine so I can peel off the hair from my quilt top before I quilt!)
With 3 dogs and a cat there is a lot of hair floating around in my house.
 |
| Finished quilt top |
Once the quilt top was done I needed to figure out borders. If you know me from facebook, you'll remember that I posted this photo of 3 possibilities and asked for advice... As many people there are following me on facebook there are opinions, lol.
 |
| Potential borders |
As you can see from the above pic, I could have gone with no borders, the dark turquoise border and the dark turquoise with a fuchsia narrow inner border. Most people really liked the dark blue with the fuchsia (see below) but a few mentioned that it cut off the tree branches too much on the left...
 |
| They liked this color border the best |
Then a wonderful Master Quilter (Claudia Myers) suggested a bi color border with a lighter open fabric on the top and left sides.... Hmmm. Very interesting. I tried this - too light don't you think? Both these border strips were in the turquoise blue family.
 |
| Not quite right... |
From there I decided I needed a medium value and not a light one and looked at this green.
 |
| Ah Ha! Perfect. |
I liked the inner fuchsia border on the right and bottom, but it cut off the top left so I didn't put it there. Here is the finished quilt top. I ended up bringing more leaves into the border area on the top so it gives the impression of the branches growing out of the top of the quilt - I like that.
 |
| Finished quilt top |
After the quilting was done I soaked it in cold water for a minute or two, spun most of the water out of it and blocked it. I was worried about any of the bold colors bleeding so I pressed it with a hot iron and cotton press cloth to quickly get it damp dry and not soaking. Then I let it lay flat overnight.
 |
| Blocking |
Once it was blocked and dried I added my binding - I chose the dark turquoise to tie the whole quilt together. That turquoise was used in the landscape and the border so everything blends nicely.
I hope you like it!
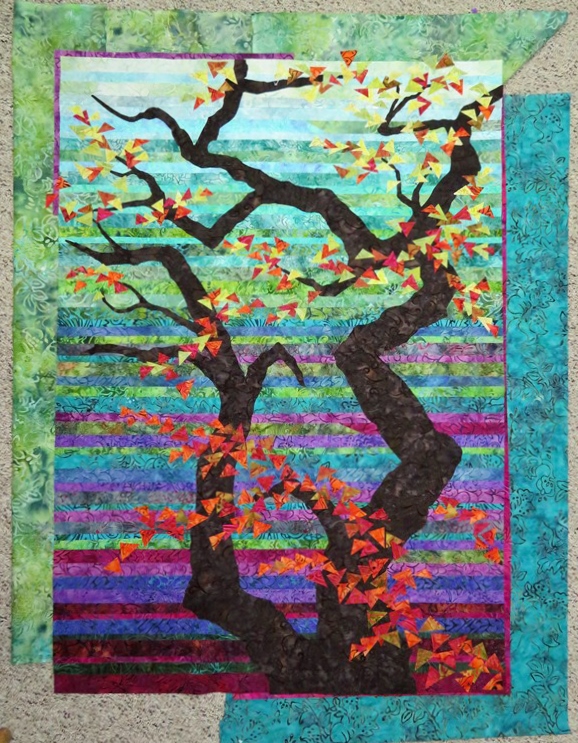
 |
| Overhanging Oak Branches, 34 x 45 inches |
The only other thing I did that was 'quiltely' interesting was to get out some watercolor pencils and color some trees so I could see if this fabric would work in a project I'm getting together. Using these pencils is easy and once the paint is dry press the fabric with a hot iron and the dye is permanent.
 |
| Watercolor pencils on fabric |
Well that's all for me this time. I'm off to start cutting kits for classes next month. I'll be teaching my Strip Applique class a lot this year (that is the technique I used in this quilt) and this means I'm cutting a lot of strips. Thousands of strips...
Any questions and comments would be welcome.
Happy Quilting everyone!
Love the border and progression you used to get there. I have used mixed colors like that a couple of times and always have been pleased with the effect. But the inner narrow strip is so striking and pulls you in with the leaves and branches spilling over. Just a super quilt!!
ReplyDeleteThanks! The strip applique technique works so well for these kinds of landscapes - you can bring in all kinds of color and have a lot of fun with fabric. I'm glad you like it. :)
DeleteI just found your blog and would love to learn more. Can you give me contact info about the retreat in Blue Lick park in Ky (March 2018)? I would like to attend.
ReplyDeleteThanks so much
Hi Unknown. Why don't you email me - I don't want to put the contact information for another person out on the web. My email can be found at the bottom of my website page - well I might as well post it here, too. cathyptpATwi.rr.com
DeleteHope you can make it!
Hi, I absolutely LOVE this! I just purchased a kit from Keepsake Quilting. Instructions call for using Pellon EK 130. But, it appears that you are now doing a different technique with the tear away stabilizer. Do you now recommend using the stabilizer rather than the Pellon Fusible Knit? I'm concerned about the raw edges shredding even with a zigzag and I am wondering if you now prefer the stabilizer and a "fold and sew" method that you seem to be referring to in your more recent designs. Thank you soooo much! Lynn
ReplyDeleteHi Lynn, I create my strip landscapes in 2 ways. One is pieced and one is the strip applique. I don't believe there is enough fabric for you to piece this quilt since every strip would lose 1/2 inch in the seam allowance. PLUS, you don't want the seams under the branches showing through and they definitely will show if there are pieced seams. (Your branches would have horizontal lumps running across them.)
DeleteUsing the strip applique method on the Pellon is so nice and easy - really it is a lot of fun. If you use a narrow zig zag with monofilament thread - clear when the fabrics are lighter and medium values, and then the dark shadowed one when the fabrics have a deep value, you really won't see it. (Especially after quilting.)
My book outlines both techniques. Don't worry about loose thread until after you have stitched them down. Then you can trim them off and the edges stay very nice.
I hope this helps. I'd love to see your landscape when you are done - just email me as needed! ( cathyptpATwi.rr.com )