
 |
| My Mary P. |
My mom took me to see Mary Poppins when I was a little girl and she told me years later that I cried all the way home because I wanted it to be real.
What was it about this sweet musical that so captured my imagination? I'm still thinking about it over 50 years later.
What was it about this sweet musical that so captured my imagination? I'm still thinking about it over 50 years later.
Part of it I'm sure was the wish for a world where things seen and things unseen mix and blend so that we are all guided to better places as we learn and grow.
Some of it was the absolutely charming lyrics and melodies.
Some of it was the idea that magic was all around us in common places - like the rooftops of London at twilight or a children's nursery room, or a tea party - if we could only see it.
My guess is that the reason this movie still resonates with me is that it teases me with the idea of heaven. For me, it points to what CS Lewis described as a longing for a distant land. A calling to a place so sweet; a place beyond my ability to imagine but beautiful and magical.
I still get misty eyed when Bert sings -
I still get misty eyed when Bert sings -
Up where the smoke is all billered and curled
'Tween pavement and stars is the chimney sweep world
When there's 'ardly no day nor 'ardly no night
There's things 'alf in shadow and 'alfway in light
On the rooftops of London coo, what a sight!
And of course the beautiful paintings by Peter Ellenshaw captured that mystery and magic. My mom bought me the book you see, so I had these beautiful images in my hands whenever I read it.
 |
| Peter Ellenshaw, Smoke Staircase |
Anyway, I'm telling you all this because it's probably the only quilt I finish this year and I wanted to explain why I'm putting so much time and effort into it.
It's a quilt from the heart.
Below is a picture of my pattern. I'm making this quilt for a competition at the National Quilt Museum - their New Quilts from Old Favorites contest. This year the old favorite is the bow tie block.
If you look back at my last blog you can see how I built the city. I start most of my quilts on a graph paper by working out my ideas and playing with arrangements.
If you look back at my last blog you can see how I built the city. I start most of my quilts on a graph paper by working out my ideas and playing with arrangements.
 |
| Not sure what I'm going to call my quilt yet... |
In my mind, I wanted a day time scene - I wanted to capture the scene when she has finished her work and is leaving. But I also wanted to include some of the 'chaos in her wake'. (From the song Mr. Banks sings before he is fired.)
As I made my Mary, I had to do some creative problem solving. First, this shot is the only full body shot of her leaving. I didn't like it. I wanted her looking at the viewer.
 |
| Bye Mary! From the movie. |
As Mary is flying away, Bert calls out to her and asks her not to stay away too long. She turns and smiles down at him. This is the face and expression I wanted to use.

The problem is that her whole body twists to turn back to Bert, but we don't see it. I needed a pattern of her whole body. This is a problem.
To solve it I watched the movie with my camera in hand.
Viola, she comes to apply for the job and now I have a nice profile shot.
To solve it I watched the movie with my camera in hand.
Viola, she comes to apply for the job and now I have a nice profile shot.

Unfortunately, she was facing the wrong way. That was easily fixed by flipping her with my photo software program.
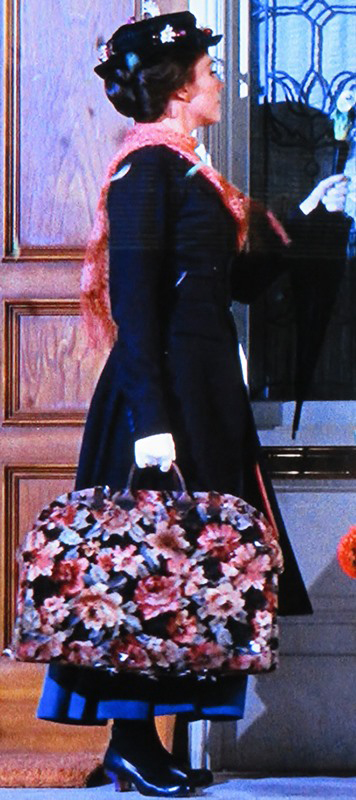
I used this image to trace her body and get her arm and carpet bag just right. I used the bust and head position shot from when she smiled down at Bert to create her top half including her hat and scarf. Then I used the shot of her dress and shoes from the photo of her flying above the city for the bottom.
My Mary is about 14 inches tall - 16 including her umbrella. I needed another shot to show me her arm and hand holding her umbrella and once again the movie helped. (See below).
All this involved printing out a lot of different sizes of each pose in order to fit them all together into one piece I could make a pattern from. Then I taped my composite picture to my sliding glass door and traced it out on freezer paper.
Whew!

Here is how I put her together.
I built her on a foundation which has a fusible on one side. I love this foundation - it's Pellon EK 130. It's a light weight knit and it holds the bigger pieces of my patterns.
When I create a figure like Mary (or like Gene Kelly from Gotta Dance!) I start by cutting out the big pieces from my freezer paper pattern. (In this case, the biggest piece was her dark blue coat.) Once the big pieces of fabric are in place, I cut into that big paper pattern and cut the little pattern pieces out of it. I use the remains of the paper pattern to help me arrange the tiny pieces of fabric. You'll see how this works as we go on.
 |
| The first piece |
Once the whole coat was cut out, I began cutting out the smaller pieces from the freezer paper. In the above shot you can see that I cut out the arm portion of the pattern and used markers to give it definition from the coat. (I just pressed on that arm pattern and traced around it).
All the small pieces of the pattern have Steam a Seam Lite fused to the back. (I fuse it on- not just press it with my fingers. This makes it easier to cut out tiny pieces.)
All the small pieces of the pattern have Steam a Seam Lite fused to the back. (I fuse it on- not just press it with my fingers. This makes it easier to cut out tiny pieces.)
 |
| The arm |
The arm is drawn on the blue coat. Mary is flying toward the lighter portion in the sky so I have to highlight that on her arm and her coat. On the photo above, I'm going to use a lighter royal blue on the right side of her arm and cut out even smaller tear drop and long shapes to create the illusion of light shinning on her sleeve and bodice.

If you have a really good image, you can posterize it using various software programs and create very detailed patterns. I alas, didn't have great images to work with so I had to fudge it. I eventually added some long lighter streaks in her coat. Which you can see below - but first her carpet bag.

I had a great floral fabric which worked wonderfully for her bag - thank goodness for large stashes of lots of different bits of florals I've collected over the years! I used a black sharpie and a black fabric dye marker to shade the bottom of her bag. Remember, we are looking up at her so we need to see her bag from that angle.
Here she is with her bag and finished coat.

Now on to her shoes! I love her feet when they stick out at that funny angle.
 |
| My pattern and her shoes |
 |
I cut the front shoe off the pattern and used a dark marker to outline it. Then I added some white highlights using a white ink marker that you can find in scrap booking sections of your favorite craft store.  |
 |
| Here is her body I didn't bother showing you how I made her little bit of dress, I just cut out my freezer paper pattern and found the perfect ripply blue batik. Then I shaded it a bit along the bottom just like I did her carpet bag. I created her hat and arm in the same way as everything else. Mary is only 14 inches and her face is about 1 x 1 inches wide. I could not make a pattern for it, but after playing around for quite a while I figured out a way to resize the photo of her head so it would fit with this body. I used photo transfer fabric and printed out her head. The other problem is that the photo was too bland for the colors in my quilt so I took after it and colored it with pencils. I added more cherry color to her lips, defined her brow line, added a bit more white in lighter area and a blush color on her left cheek. It still isn't as good as I'd like it but I'm afraid I'll wreck it all together if I keep messing with it. My husband's mother used to say "if it ain't broke, don't fix it". My husband is a bit of a perfectionist so I'm always telling him "don't let the perfect be the enemy of the good". I'm trying hard to follow my own advice! |
 |
| Here she is, but the pic is lighter and brighter than she really looks. |
On to the umbrella and hand -

Umbrella pieces
 |
| You can use the larger freezer paper pattern to help you place the smaller ones inside. |
The hand - it was a bit tricky
 |
| The pattern and the base fabric |
To start off, the whole hand and umbrella handle was created out of one piece of fabric, I choose a mottled white with flecks of gray.
 |
| I cut out the hand and pressed it to the mottled white print and using a black marker, colored the umbrella handle and its decorative tassel. |

Next I shaded in the area using a black colored pencil to give the illusion that the handle to her umbrella was something out of the ordinary. (Remember it was that parrot?!)

The right part is done - now to the hand itself.

I peeled off the freezer paper pattern of her glove and used a light touch and a colored blue pencil to create the 3 dimensional thumb and lightly shade under it. I chose blue because it looked natural with the blue sky behind her and her blue coat. It worked well! (I also highlighted a bit of her thumb with a white marker.)

And here she is - all put together. I used a black marker to make the ribs in the umbrella.
 |
| Mary Poppins |
And lastly I'll show you Mary in the sky saying goodbye.
My design board isn't big enough to hold the whole thing so it droops on top.
My design board isn't big enough to hold the whole thing so it droops on top.

Next blog I'll show you how I made the bow tie blocks in the sky and what I ended up doing with them. Hint? It has something to do with 9 of my favorite songs from the movie.
As always, comments and questions are welcome!
I absolutely am in love with this! I fondly remember Mary Poppins and this wonderful story~
ReplyDeleteThanks Glenna!
DeleteMy oh my! Just absolutely amazing. Thanks for taking us along on this journey, you're a talented person!
ReplyDeleteThank you! I've been quilting for 30 years and I guess I've learned a few things along the way. I feel like I've finally found my voice... if that makes sense. I'm glad you like the quilt!
DeleteThank you for taking the time to explain how you created the pose of your Mary Poppins. It is such a great quilt!
ReplyDeleteYou're welcome, I'm glad you like it!
DeleteWow! This quilt will be stupendous when finished. I am in awe of it and how you made Mary Poppins. Thanks for going through all the steps to demonstrated how that all happened. I would never have guessed how you did these pieces. I will be thinking about quilting in a whole different way now because of this. Thanks so much for writing and photographing this post. I think I'll go back and read through it one more time!
ReplyDeleteThank you Karen, I'm glad you found this helpful. I made Gene Kelly the same way (a couple of years ago) but my computer crashed and I lost the WHOLE in progress file. I about cried. Anyway, I hope you will like the finished quilt as much as you like it now! Thanks again.
DeleteI love this!!! I went around singing those songs all the time.
ReplyDeleteThanks!!
DeleteLove this film and you have done a fantastic job creating this quilt - thank you for the great blog
ReplyDeleteThank you! I'm glad you like it. :)
DeleteHow did you get through the copyright issues? Was it difficult to get permission to use the image, and to include the song lyrics in your blog?
ReplyDeleteI couldn't get through the Disney maze so I went ahead anyway. I'm assuming I'm covered under Fair Use provisions. :)
DeleteThis is what I think I'm covered under - in case you want to read more.
Deletehttp://info.legalzoom.com/legal-use-disney-characters-21231.html
At least I hope I'm covered!!!
DeleteThis is fascinating! Thanks for sharing your techniques.
ReplyDeleteThanks! I shipped her off to the National Quilt Museum a couple of weeks ago. I won't see her for a couple of years now and I miss her already. :)
Delete