
 |
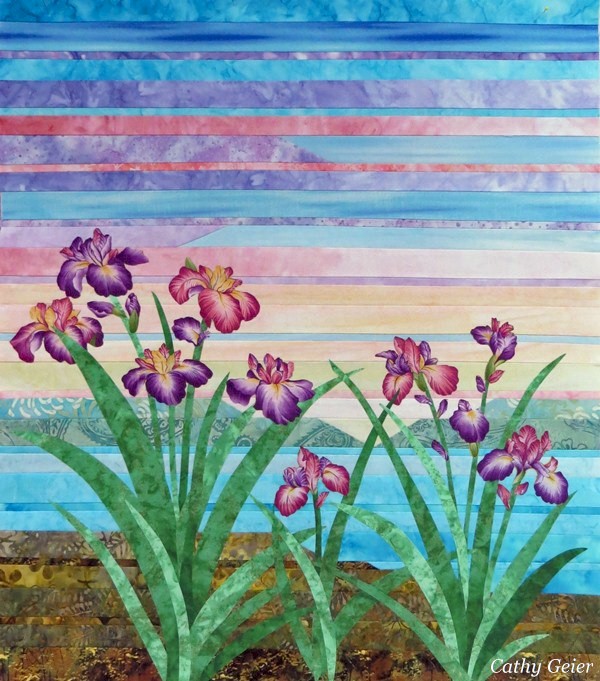
| Irises at Dawn by Cathy Geier |
I finished a sample project for my Strip Pieced Landscape quilt class. Well sort of finished, I haven't quilted it yet. The last 3 little quilts I made have yet to be quilted actually. I think I'm a bit burnt out on the quilting part of making quilts. Maybe I should take my old machine in for a tuneup and enjoy the time off?
And get busy baking Christmas cookies and fudge!
I left off last week with the strip pieced background done. This week I fused on the flowers and leaves. I began by arranging the iris blossoms since these are what attract your attention first. Once they were arranged, I added leaves.
 |
| Beginning to add the leaves |
The leaves are just long comma shapes which I free hand cut with my rotary cutter and mat. If you choose to use a paper backed fusible web like I did, you can always draw out these long shapes and then cut them out. As you can see, each leaf begins and ends with a point of sorts which makes them easier to arrange at the bottom of the plant and they look more natural.
 |
| Adding more leaves |
The green print I used to make the leaves was variegated. This gave me the option of adding lighter values of leaves in my clumps. I love those variegated prints! I used them in the sky too - both the purple and the pink. (You can see how the right side of a couple of strips in the sky is lighter than the left side - this adds so much atmosphere and makes value changes easy to accomplish.)
 |
| All Done |
When I quilt the leaves, I'll be able to add long veins and then I'll probably go over a few of the thick ones with my white Galaxy marker to add highlights on one side... All in all I think this is a very pretty little project.
Every once in a while I have to dig out a quilt for one reason or another. (I keep most of my quilts hanging over a rod in the basement!) This week I needed to find a couple of project quilts for a class and as I was digging, I pulled out this unfinished quilt from 5-7? years ago. I really need to finish the edges on this baby. It is a huge wall quilt - 46 x 68 inches.
 |
| Sonoma County |
I made this quilt after a trip to Northern California to teach in Grass Valley about 10? years ago. I remember thinking about how beautiful and different wine country is from our countryside here in Wisconsin. Meadows in Wisconsin are green and lush and filled with wild flowers throughout most of the summer, but in Northern California the meadows were dry and golden brown. Dry and golden only under green green trees and a beautiful blue skies.
And then we saw the vineyards with row upon row of grape vines and many many wine tasting possibilities as we drove through Sonoma County. Soooo, I made this quilt to remember the colors and my trip.
I used my fold/sew technique to sew all the back ground squares together - I didn't make blocks in the usual way. I wanted to organize my colors a bit so I arranged groups of 3 greens, 3 blues and 3 lavender squares to mimic the play of those colors against the colors of the golden dry meadows that you see as you drive along the roads in wine country.
I added the narrow brown rectangles to create a 'trellis' for the vines. I used a lot of scraps to make this quilt - and had a lot of fun.
Here are some detail shots and I'll explain how I made the grapes and leaves.

I use google images a lot! To make patterns for the clumps and the leaves I just printed out grape leaves and hanging grape clumps, traced them and made patterns on freezer paper. From there I cut out leaves and grapes from various batiks.
Using oil pastels - these are like crayons - I drew each individual grape circle using a dark green. Then I highlighted one side of each grape with a lighter green. The last detail shot shows you how I created the illusion of light shinning on grapes by making comma shapes on a few with a white pastel.
I did the same thing with purple grapes. I started with a dark purple to outline them, then added lighter lavenders on one side of each grape to give them the illusion that they were round.

Remember that I made my leaves and grapes using freezer paper. To create the shadows under the leaves and grapes, I used 2 layers of dark tulle which were bonded together using BoNash bonding powder. The freezer paper shapes didn't stick as well to the tulle as I was cutting them out, but it did well enough. Once those long tulle shadows were cut off, I used BoNash bonding powder to fuse them under the grapes and leaves. They made great shadows!
Oh, the leaf veins were drawn on with pastels...
The grape vines were made using long narrow bias tubes.
The grape vines were made using long narrow bias tubes.

I added ghost grape clumps and leaves as part of the quilting just for fun. After quilting them, I went over the shapes with pastels to make them stand out more. I outlined stitched each individual grape. (I think they turned out great!)
I added a few loop da loos here and there, but for the most part this whole quilt is stippled.
Which is why I probably won't ever show this quilt. 10 years ago stippling a quilt was more acceptable and the 'artistry' of the quilting itself wasn't quite as important as it is today. As I look at this quilt with today's eyes, I wish I could have known about echo quilting and better filler designs.

Oh well. I still need to finish the edges and hang this quilt up in my dinning room. I had a lot of fun making it and playing with pastels on fabric.
Maybe some winery will want to buy it for their wine tasting room? That would be great and then I could make another one - only one a bit smaller.
You probably won't hear much from me until after the New Year. The more I understand about the origins of Christmas - the pagan origins - the more I can appreciate how all sorts of cultures thousands of years ago needed to create festivities to lighten up their lives in the darkest part of the year. Only a couple of weeks more though and our days will start getting longer. Yippee!
May all your holidays be blessed times with family and friends. And may all of us show love and respect to one another during these dark December days, regardless of religion and race.
Comments and questions are welcomed. See you all in 2016!
You are so talented and inspiring! I love your blog.
ReplyDeleteThanks! I glad you like it! :)
DeleteI really like what you have done with your expression of wine country visit. I am starting to design one as I just went to the Okanogan area in British Columbia for the first time this fall. I live on the prairies so it was really different. Keep up the good work as I am one of many who enjoy seeing your visions come to life.
ReplyDeleteThank you! I'll do my best, lol. There are a lot of different climates in British Columbia, it is pretty neat that there are grapes and vineyards there. (I used to live in rainy Ketchikan, Ak along the inside passage. Our climate was rather more like British Columbia than one would think of in terms of its being in Alaska. If that makes sense...
DeleteI'm glad you like the blog! Thanks again for writing.
Cathy, how are the iris made? Painted? cut out of fabric? made piece by piece?
ReplyDeleteI have a quilt done using your landscape book. I'm so happy with the way it turned out.
Hi Susan, they are a printed fabric. In my blog from December 4th I showed the fabric. This is basically broidery perse applique. Or in English cutting and pasting, lol.
DeleteI'm glad to hear my book was helpful! Are you making more landscapes now?