
 |
I'm so happy that people like my new book. I've had a lot of people tell me about it on facebook and it is still the #1 New Release (quilt book) on Amazon! There are quite a few simple projects in it, and as the saying goes "You have to learn to walk before you can run".
My latest quilt is one for runners. This week's blog will continue to show some of the steps and a bit of the process. My quilt is pieced and ready for applique.
At the end of last week, I was transferring completed strip sets to a tear away foundation. These strip sets were simple: they did not have 3 or more separate strips and they did not have to be too fussily placed.
In case you are wondering why I use a tear-away to piece these types of landscapes, it is because those long perfectly straight rows add so much zing to the finished piece. I really like the look of long straight rows, to me it is contemporary and pleasing. Curved seams would take away from the beauty in my opinion.
Back to my quilt.

The foreground strips have all be transferred, now I'm on to the distant mountain peaks. These mountain peaks are the tricky bits. Sooooo.... I'm NOT going to sew these strips together. I'm going to use glue.
There is no cheating, this is foundation piecing.
Or foundation applique.
*Wink*
There is no cheating, this is foundation piecing.
Or foundation applique.
*Wink*

I bring my strip set over to the foundation and arrange the background strips - in the case above these are light misty blue - and I glue these directly to the foundation.
Then I take the top strip - which is the portion of the landscape closest to the viewer - press the angle in place and glue it down over the bottom strip.
Let me show you some of this process. As I said last week, this blog isn't meant to replace Chapter 4 in my book, I just can't show you every little thing in a blog - the process takes too many other little steps. Plus, you should buy my book.
*Wink II*
Let me show you some of this process. As I said last week, this blog isn't meant to replace Chapter 4 in my book, I just can't show you every little thing in a blog - the process takes too many other little steps. Plus, you should buy my book.
*Wink II*

I'm continuing to add mountain strips here and I'm using my glue stick to anchor them to the foundation AND to turn the edges of the angles under so they are not 'raw'.


I use a glue stick to turn under the edges and trim off the extra fabric.
Yes I trim off some of the background strip as well.
Yes I trim off some of the background strip as well.


Once I'm done adding the glued portions, I stitch the edges down with monofilament thread and continue adding 'regular' strip sets to the foundation.

The angles in the sky strips don't need to be closely aligned.
These strip sets were already pieced (last week) and all that is left is gluing them to the foundation.
These strip sets were already pieced (last week) and all that is left is gluing them to the foundation.
 |
| Completed foundation section |
Now all I have to do is fold and sew 1/4 inch from the lines I drew on my foundation. I make sure that there is no fabric bunching underneath as I fold it over and I sew using a LARGE needle and TINY stitches.
I use narrow strips a lot when I'm designing strip pieced landscapes. I can add bold color and highlighting by using these narrow strips and they make the landscape more visually exciting. They are folded and sewn in a little different way though to help keep them straight and perfect. (Chapter 4 shows this process)
I use narrow strips a lot when I'm designing strip pieced landscapes. I can add bold color and highlighting by using these narrow strips and they make the landscape more visually exciting. They are folded and sewn in a little different way though to help keep them straight and perfect. (Chapter 4 shows this process)
There is a tedious part to using a tear-away foundation to piece; you have to tear it away. For me, the easiest way to do it is to run a seam ripper along one side of the seam and cut open the foundation. (We are only going to remove the foundation from the seams at this point.)
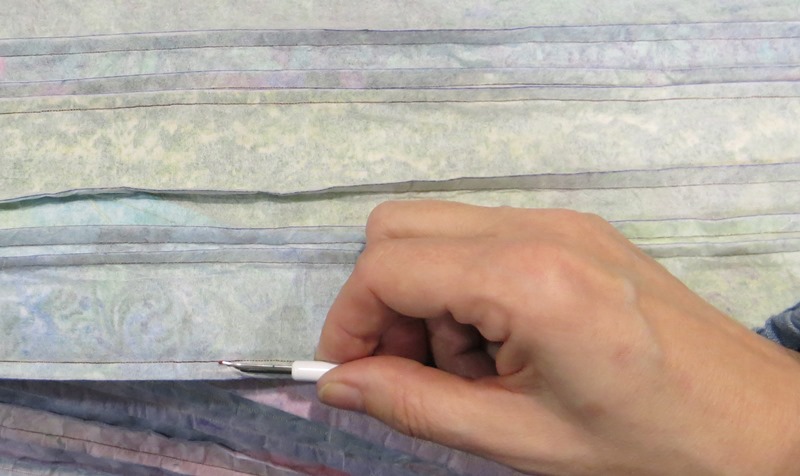
Once the seam is torn open, it is easy to grasp the foundation and tear it away.


After the foundation is torn away from the seams, it is pressing time. I usually just run my iron carefully up the finished 1/4 inch rows, pressing them open. Everything needs to get pressed and then trim your quilt top making sure all your edges are square and sides are even.
And this is where I am in the process today. I'm ready to add applique flowers and leaves. (Which I'll get to after the holidays and perhaps it will be later than that - we are moving my wonderful daughter to grad school in Virginia the second week in January.)
If you haven't created a strip pieced landscape before, this quilt is not one to try it out on! There is a lot that has to go into making mountain hillsides, understanding how the angles effect the slope of your hillsides and learning how to add color and glow. Start small and simple to learn the techniques before launching into a big landscape.
(This one is 51 inches across).
 |
| Carpathian Sunset? I don't know what to call it.... |
I'd like to take a second and wish you all Happy Holidays this year. I wish everyone joy in this season whether you celebrate Christmas like I do, or Hanukkah, Kwanzaa, Boxing Day, Ramadan, Omisoka, or Fiesta of Our lady of Guadalupe and St. Lucia Day.
These days are special times for many different peoples and there is nothing wrong with wishing you all the best as you celebrate. Or with you wishing me Merry Christmas as you celebrate a different holiday.
May you all have good times with friends and family this year and may we all learn to get along with our differences, learn to respect one another, and wrap ourselves in kindness as much as possible.
Lastly, a blog without Ellie Cat is like a day without sunshine.
May you all have good times with friends and family this year and may we all learn to get along with our differences, learn to respect one another, and wrap ourselves in kindness as much as possible.
Lastly, a blog without Ellie Cat is like a day without sunshine.

As always, comments and questions are welcome.
Wow! I just "stumbled" onto you through a convoluted blog surf. I really love your strip work - it's so pretty and shimmery. It's nice that you've shared so much about your process here, and I'll have to go check out your book!
ReplyDeleteThanks - If you get it, I hope you like it. I'm having a lot of creative fun using strips and as many as I make, I still have more ideas. Thanks for writing in!
Delete