 |
| Background fabric |
The first thing I did was to choose a background fabric. This is a fat quarter of a variegated fabric which will work great for suggesting atmosphere and a forest floor. I knew I wanted to use the golden leaves I blogged about last time, and their color really kicked with this blue/green background. Plus, one of my favorite fall scenes is when just a tree or two has turned while everything else is green. I love that color combination!
 |
| Background foliage |
I choose 3 background foliage prints.
 |
| How NOT to arrange tree trunks |
Am I building a forest or a jail scene? Lol, don't arrange your tree trunks like jail bars.
In my previous blog I showed you how I use dye markers to highlight and shade tree trunks. Since this class is mainly for students to learn how to use these tools and to build up their confidence, most of this scene is tree trunks. (When I teach this class, I bring all of the markers so students only have to buy the fabric kit.)
In my previous blog I showed you how I use dye markers to highlight and shade tree trunks. Since this class is mainly for students to learn how to use these tools and to build up their confidence, most of this scene is tree trunks. (When I teach this class, I bring all of the markers so students only have to buy the fabric kit.)
 |
| A better arrangement of tree trunks |
Usually when you make a forest scene, you cut out a bunch of 'messy' cut background foliage before you add your tree trunks. These messy patches are glued down in a random fashion to suggest background leaves and shrubs. Since the important part of this quilt is the tree trunks, I added them first.
 |
| Messy cut shapes |
I use the right and the wrong side of fabrics when I cut out these shapes. Notice the shapes - they are not round oval blobs. This is the hardest part of making these landscapes if you ask me.
(And I think most of the students in my landscaping classes agree!)
(And I think most of the students in my landscaping classes agree!)
 |
| Finished arrangement |
Once everything is glued down (I use a simple glue stick), it is time to stitch the applique patches in place. I use a monofilament thread - using the light/clear with the birch trees and the dark colored nylon for the elm trees.
At least I think they are elm. :)
At least I think they are elm. :)
Once things are stitched down, I take the quilt top to my cutting board and square up the corners and edges. Then I sew on border fabrics, baste and quilt.
 |
| Borders added, quilting done. |
When I finished the quilt, I didn't like the top so much. Those gold leaves weren't quite right with all the greens in the fabrics. Sooo... I added MORE leaves.
*Cue Music*
It's my party and I can add if I want to.
*Cue Music*
It's my party and I can add if I want to.
 |
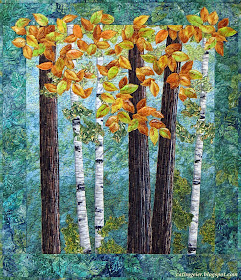
| 3 Hour Workshop - Finished (Click for a bigger image if you'd like.) |
As always, questions and comments are welcome!
(And I head back to my happy place where I figure out what I want to do next!)


Great tutorial.....super piece. Thanks for explaining your fabric and color selections, too.
ReplyDeleteThanks! I've made this quilt so many times that it comes pretty easy now. I'll be making another in different colors soon so I'll post a bit about that too. For me the tricky bit is finding good leaves. It is always hard to get natural leaves.
DeleteI wish fabric designers would look to mother nature when they design. :)
This is so beautiful! I wish I could take the class to learn how to make this. My dream is to someday make art quilts. But where I live (north central Wisconsin), there are no classes nearby whenever I check into them.
DeleteAre you going to come down to visit Quilt Expo in September? If the powers that be sign me up to teach a workshop, you could take the class. If you belong to a local quilt guild, maybe ask the program chair to look me up. Because the class is only 3 hours, my students have a lot of fun - they learn just enough to launch out on their own but it isn't as stressful as the all day class projects. Thanks for the compliments by the way! :)
DeleteWhat do you use to cut out your leaf shapes, etc.? Scissors? If so,what kind?
ReplyDeleteJust a small pair of scissors. Most of the leaves I cut are out of a leafy print so all you have to do is cut around the edges. :)
Delete